If you have a boy, you NEED this! DYI PVC Building Set

PVC Building Set @ Three Cornered Hug

A seemingly simple idea has provided us with a lot of fun–especially during the winter months when we need active indoor ideas.

We first saw a set like this at a kid’s museum (Cincinnati maybe?), and my son and husband spent forever lingering at station. When I got home, I thought–how expensive could that be? Well as it turns out, some of the little connectors add up, but overall, this is a good deal when you consider the cost of Legos and other building sets for kids. In addition we’ve been able to use this in so many more ways!

So, the set up is basic. We bought several long lengths of PVC pipe from Lowe’s and cut them down to 1′ lengths. We did this the hard way (with a hand saw), but a friend who borrowed the idea had her handyman husband cut them with an electric saw, which was much more accurate and faster. If you do this, I suggest you find a friend with a good saw.

Then, we basically bought every kind of connector we could find. AND THAT’S IT! See? I told you it was simple!

The amazing thing is all the different ways your kids will find to use these. You can make a structure which you can throw a blanket over for a fort, you can get a hose attachment and use them outside for a wacky sprinkler, I have seen kids make letters with them–the possibilities are endless! (If you blow into them just right they make a weird sound, too- like a sheep’s horn!)

So, what are you waiting for? Run out and get some! You won’t be sorry! (Unless you don’t warn your kids ahead of time about using these as swords)

Image

Recommended Resource: Incredible Art Department

Cookies

First of all, this post should really be titled: Cookies+Frosting=Education! Anyone who knows me will tell you that cookies are my FAVORITE FOOD. Now when I found a website that showed me how to work them in as an educational tool- I knew I had hit Homeschool Heaven!

An edible color wheel is just one of the ideas I’ve snagged from the Incredible Art Department. This site is a wealth of information with lesson plans for every age from preschool all the way up. They even include some lessons which integrate drama. Many of the ideas are provided by actual art teachers, and several have information about artists with them.

Calder

Modern mobile in the style of Alexander Calder found on Wikipedia

I taught a lesson on Alexander Calder using their plans, and we had a great time bending up wire and trying to balance it out. Bubble wrap prints and paper marbling were some other favorites of ours.

You can take advantage of the search feature by typing in the name of an artist you are currently studying, the name of a people group (such as Native American), or a time period (ex Middle Ages).

We belong to a co-op that meets weekly for art lessons, and one of my favorite ways to utilize this resource is to type what supplies we already have into the search line.  People sometimes donate materials and we can reuse those instead of having to purchase new materials. This makes my frugal side happy…Which makes all of my other sides happy too 🙂

Bubblewrap

Provided by First Palette

Image

Beat Summer Boredom: DIY Sidewalk Paint

DIY Sidewalkpaint @ threecorneredhug.wordpress.comThis is something we’ve done every summer for the last several years. Kids of all ages love it, and children come from all over to join in–even those that one might think would be “too old”.

Sidewalk Paint @ threecorneredhug.wordpress.comIt’s a pretty simple recipe. You can just put a little bit of flour, or even cornstarch into a disposable cup or storage container and add a little bit of water at a time until you get a thick consistency, almost like gloopy pancake batter.

Next, you add, some food coloring until it looks nice and vivid. Red tends to require more, and I used a really concentrated dye this time. DIY sidewalk paint @ threecorneredhug.wordpress.com

I know the biggest question here is, “Will it wash off“? The answer is yes, it will wash off of your sidewalk, but it may not wash off of your kids’ clothing. Make sure they dress accordingly 🙂

Sidewalk paint @ threecorneredhug.wordpress.com

Beat Summer Boredom: Ultimate Water Rocket!

I don’t mind telling you that my husband is the coolest dad on the block. What makes him so cool? Is it a red sports car with all the bells and whistles? Nah. The suave way he dresses? Not a chance. What is it then? It all comes down to one highly sophisticated toy.

Behold: the Water Rocket!

Water Rocket @ threecorneredhug.wordpress.comOk, so it doesn’t look like much, but this is totally the kind of thing that MacGyver would have used to keep cool in the summer (remember him?). Kids gather from all over the neighborhood to watch my husband shoot it off, and to hopefully get sprayed. The water rocket is even more popular than fireworks come Independence Day. A boy who visits his Grandparents across the street annually remembered it from last year. He begged us to bring over on the 4th. His grandpa, who teaches physics at the university here, is equally amazed– “It’s so scientific!”

If you’d like the plans to make your own, click here to go to the This Old House website. You can get plans and there’s also a video to show you how it’s done. You might tweak it a little. I’m told that it would be better to attach part of the string to each side of the trigger mechanism instead of one side as planned.

Now you too can be the the coolest. Only if you don’t live on my block 🙂

Beat Summer Boredom: Printable Paper Planes

Printable Airplane & Helicopter PatternsSome years ago, I found this great site for printing out plane and “helicopter” templates. I’ve found that they never, never cease to amaze kids. The planes have varying degrees of difficulty, but the helicopters are so simple, it’s ridiculous, and they’ll keep kids busy for EVER- especially boys. And just a warning: if you make a boy one of these copters, he’ll want you to make more. Many more. You can make them fly just by throwing them up, but if you’re a cool mom you’ll let the kids stand on a chair.

*note: you’ll need a paper clip for each little helicopter.

Find the templates here.

Image

Beat Summer Boredom: Reverse Tie Dye

Twisted

My Grandma’s parents both passed away very early. The many kids that survived them were split among relatives. Grandma was sent to live with her Grandmother who was a pretty tough- she ran a maternity hospital in the Detroit area which was no small feat for a woman back in her day. My Grandma spent most of her childhood in that hospital helping out, and as a result she was a pretty spunky lady. She lived with us when I was growing up, and many colorful times were painted on the canvas of my life as a result of her colorful personality.

One of the things that sticks out most in my mind about our wonder years is that boredom was simply not allowed. “Sarah,” she would say, “only stupid people get bored.” (This was one of her many signature quotes. She really had a way with words, no?)

Now considering all of this, I have been wondering lately just WHY the summertime makes me feel so stupid. Read: BORED! I guess it’s because our homeschool group doesn’t do much during the summer, everyone is on vacation, and we don’t have family in town. Really, here it’s so hot and muggy that one doesn’t feel like doing much at all- but that’s so…boring!

Fortunately, there was a second half to her saying: “Smart people find something to do.” Now if you ask my husband, he will tell you that this is a driving force behind my everyday life. I don’t sit around for too long before I’ll find something to do. I’ve always got a project going.

Also fortunately (for you!), I’m going to try to share some of the kinds of boredom killers we’ve tried so you’ll have some things to do to finish out your summer with a bang!

One thing we’ve had a lot of fun with is reverse tie dying. The thought hit me awhile back after doing some “traditional” tie dye that it may be able to be done in reverse with bleach. So what did I do first? The same thing you would do! A quick search on Pinterest proved that I wasn’t the first one to imagine the possibilities here. Since then, we’ve tried it many different ways. While one can get contact paper and cut out a design to stick on and spray around, it seems that the more traditional tie dye looking shirts are a bigger hit with the younger folks.

Fan fold
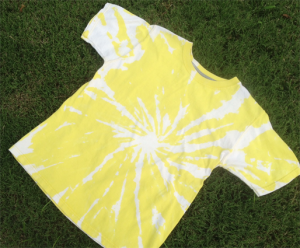
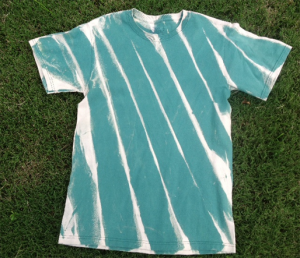
For the yellow example shown above, we put the shirt down flat on a table, grabbed it in the middle and started twisting until we got a flat sort of ball. Rubber bands were wrapped just snugly around the sides to spray. For the one with diagonal stripes, just use a fan fold on the shirt starting at one sleeve. This one was harder and took a couple of tries to get it folded right. It was then secured by putting rubber bands around it all along the length. It helps to have more than one set of hands for this.

Put some full strength bleach in a spray bottle and go to town!

Tips:

  • Use a 100% cotton if possible.
  • Make sure you get enough bleach on the exposed parts. It doesn’t spread as much as traditional dye. However, sometimes as with the fan fold, you can try it, let it sit a few minutes unfold and fold again to reapply if needed. (This does not apply to doing shirts with contact paper designs as mentioned above. Less is more with that method.)
  • When you are finished letting the bleach do it’s job, just hose it out well and then wash, or throw it right into the washer (alone).

This is a fun project and it’s really neat to see how the colors change. The yellow shirt turned to a white and the bluish green turned into a peachy cream (although it’s hard to tell in the pic). We’ve also tried black which lightens to a rusty sort of color and some red just turns lighter red.

Enjoy!

*PS I apologize for using a potty word which may or may not be allowed in your house. I sincerely hope your little ones were not reading over your shoulder. Keepin’ it real 🙂